


How to Quickly Fix AC3, DTS Audio Playback in MX Player
Due to some unknown licensing issues, MX player has removed support for some of the audio formats in their app
Due to unknown licensing issues, MX player has removed support for some audio formats in their app. We are talking about AC3, DTS or Dolby, and MLP here. MX Player is probably the best video playback app for android users. Millions of users use it, including me. But after using it for a while, they found out about the issue in playing some audio formats.
If you got any high-resolution video of any movie or favorite TV series, you might find that the audio won’t play. You get an error “Audio format (AC3) is not supported“, though the video is playing correctly. Many users head out to Play Store to find an alternative to MX Player, like VLC or KMPlayer.
Well! Why bother with such a small problem? Why would you have to give up using such a fantastic video player when it takes only 5 minutes to solve this problem? So, How do you fix AC3 and DTS audio playback in MX Player? Here is the step-by-step illustration to restore the AC3 audio playback support in MX Player. Before going further, you must find the correct custom codec for the MX player.
Steps to fix AC3 audio playback in MX player:
- Open- the MX player and click on the Options.
- Now go to settings.
- Click on Decoder.
- Scroll down to “General” and note your custom codec.
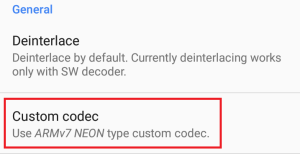
Here, you can see my custom codec is ARMv7 NEON. So, by following the above steps, you can find your custom codec, which is required to fix the “Audio format (AC3) not supported” issue.
Now go to the following link, which has all the custom codecs to download. But, before downloading, you need to find the version number of the MX Player you are using.
- Open- MX Player
- Head down to Options-> Help-> About, and note down the version number.
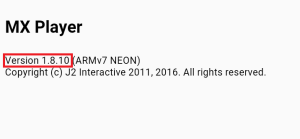
Check if you are using v1.7.40 or v1.8.0, or v1.8.6 and above (Note: If you have v1.8.4 or v1.8.5, you need to upgrade it to v1.8.6).
Download The Codecs
According to the version of the MX Player you are using, download the suitable custom codec. If you are unsure about the custom codec, you can also download the AIO pack for MX Player v1.7.32-40, the AIO pack for MX Player v1.8.0, or the AIO pack for MX Player v1.8.6 and v1.8.6+.
Note: You must download the correct Custom Codec because the codec may differ for different devices.
Now that you have downloaded a suitable custom codec, the next step is to add your downloaded custom codec to MX Player. There are two ways to add a custom codec to MX Player. If you have downloaded a suitable custom codec, follow Method 1. If you weren’t sure about your custom codec and downloaded the AIO pack, or if Method-1 doesn’t work, follow Method-2.
Method- 1:
- Put the downloaded custom codec file (ZIP File) into the internal memory (NOT in any folder); if it is already in an internal folder- NO Problem; if not- move it to internal storage.
- Next, open MX Player.
- MX Player will automatically detect the custom codec (if found) and notify you in the prompt window.
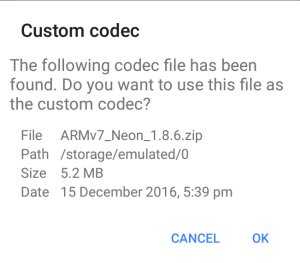
- Click on OK, and now MX Player will restart itself.
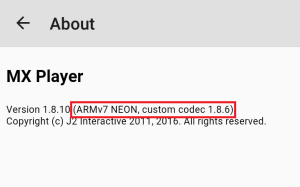
- To verify whether your custom codec is successfully added, go to Options-> Help-> About. If the Custom codec is added successfully, the Version number can be seen below; see the image below.
There might be a case in which Method 1 can be unsuccessful. MX player won’t automatically detect Custom Codec. In this case, you must manually choose the correct path for your Custom Codec.
Method- 2
- Open- MX Player, and go to Options-> Settings-> Decoder.
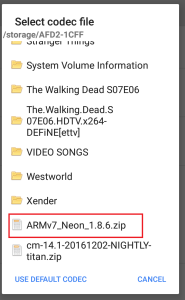
- Scroll down to the bottom and select “Custom Codec.” A window will be prompted on the screen; choose the correct path you have downloaded Custom Codec.
- After loading Custom Codec, click on “OK,” and now MX Player will restart itself.
- To verify that a custom codec has been added successfully, open Options-> Help-> About. It can be seen right below the version information if it is loaded successfully.
Now, you can enjoy watching your favorite videos without worrying about audio playback support.
I hope this article has helped you in solving the issue. Do share this post with your friends. Let us know if you have any questions in the comment section below. You can also comment on the subjects you would like us to post. Also, do read some of our exciting articles listed right below. Stay tuned for future updates.